Reports - Get started
Requirements
The following scripts are required to use Reports and all related functionality covered in the Reports guides:
scReportSchedulerscReportsscAlert
This section covers the basics of the Report module, including how to add a new template, how to use existing templates in WideQuick® Runtime, and how to schedule reports to run automatically.
Setting up the Reporter
WideQuick includes a set of default report templates, found under Reports in the project tree. Custom templates can also be created or imported through WideQuick® Designer.
To create a new template, right-click Reports in the project tree and select Add Report. This will open the following window:
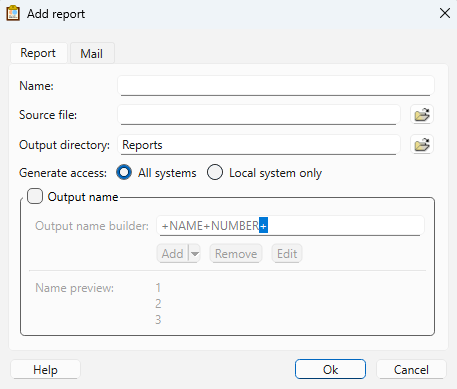
- Name — The name of the report.
- Source file — Import a premade template by clicking the folder icon. To start from a blank template, see the gif below.
- Output directory — The folder where generated reports will be saved. By default, reports are placed in the Reports folder. Click the folder icon to select a different destination.
- Generate access — Choose between All Systems (default) or Local System Only.
- Output name — Customize the report file name using the Output Name Builder. A preview of the name is shown in the Name Preview field.
The new template will appear under Reports in the project tree, where it can be edited to display the desired information. For more information on creating custom templates, see here.
Adding a template
When adding a custom template, a corresponding ReportController must also be created. This is explained here.
Using the Reporter in WideQuick® Runtime
To manage reports in WideQuick® Runtime, navigate to History → Reports → Reports - List. This page displays a list of all generated reports with two columns:
- Report — The name of the report, defaulting to Alarm Report [#] where [#] indicates the generation number.
- Timestamp — The date and time at which the recording ends.
From this page, reports can be created, removed, or sent as email attachments. Sending reports by email requires an SMTP server to be configured, which is explained here.
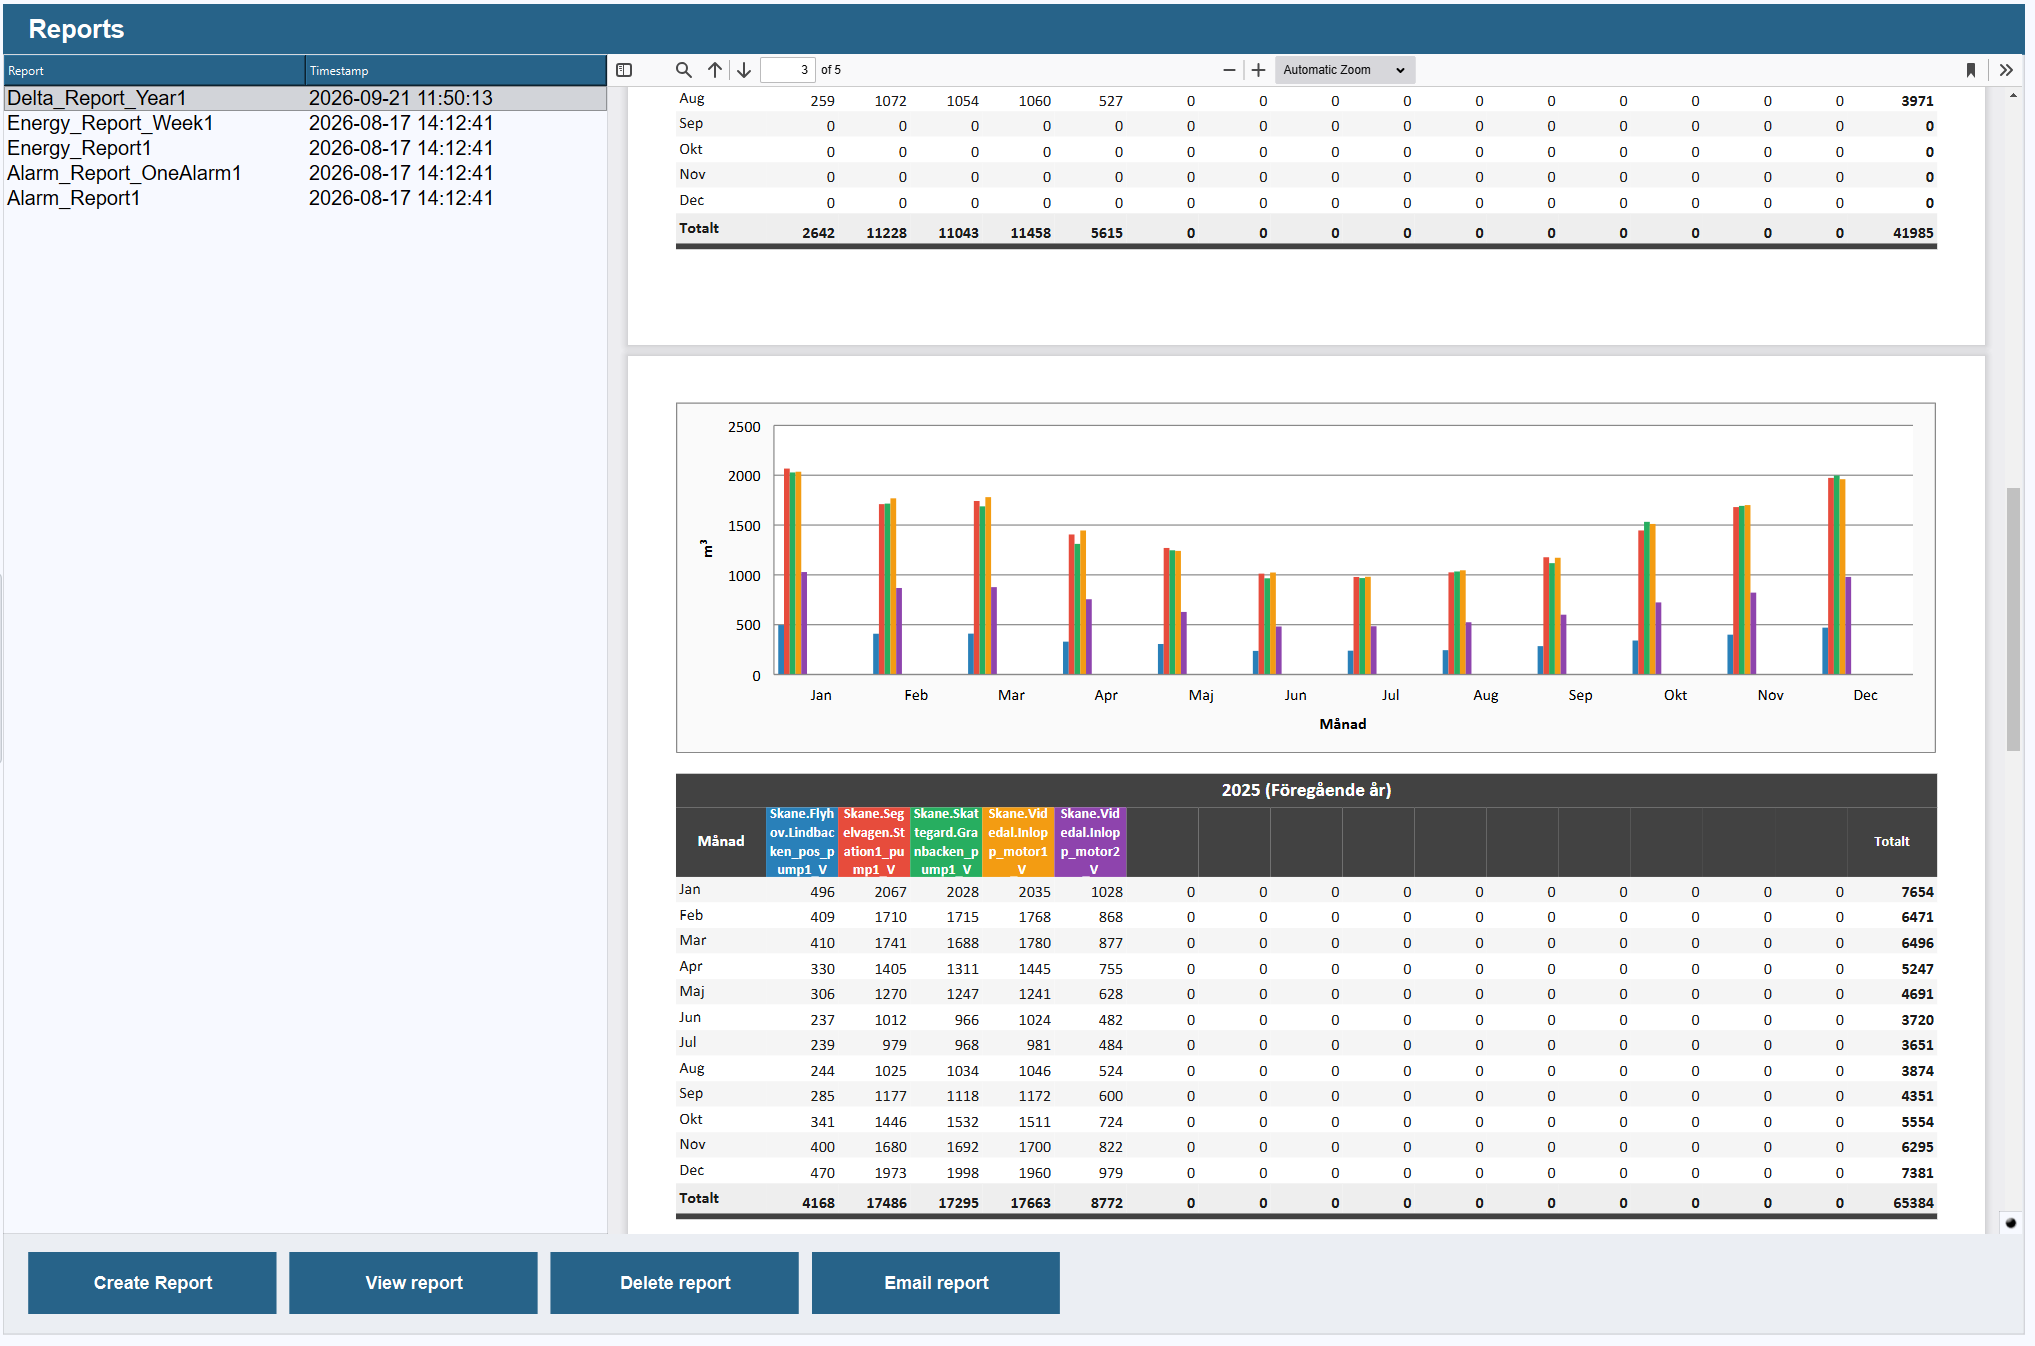
To create a new report, click Create Report. A configuration menu will appear on the right. By default, six report types are available: Alarm Report, Alarm Report One Alarm, Energy Report, Energy Report Week, Delta Report Week and Delta Report Year. Switch between them by changing the Report template dropdown.
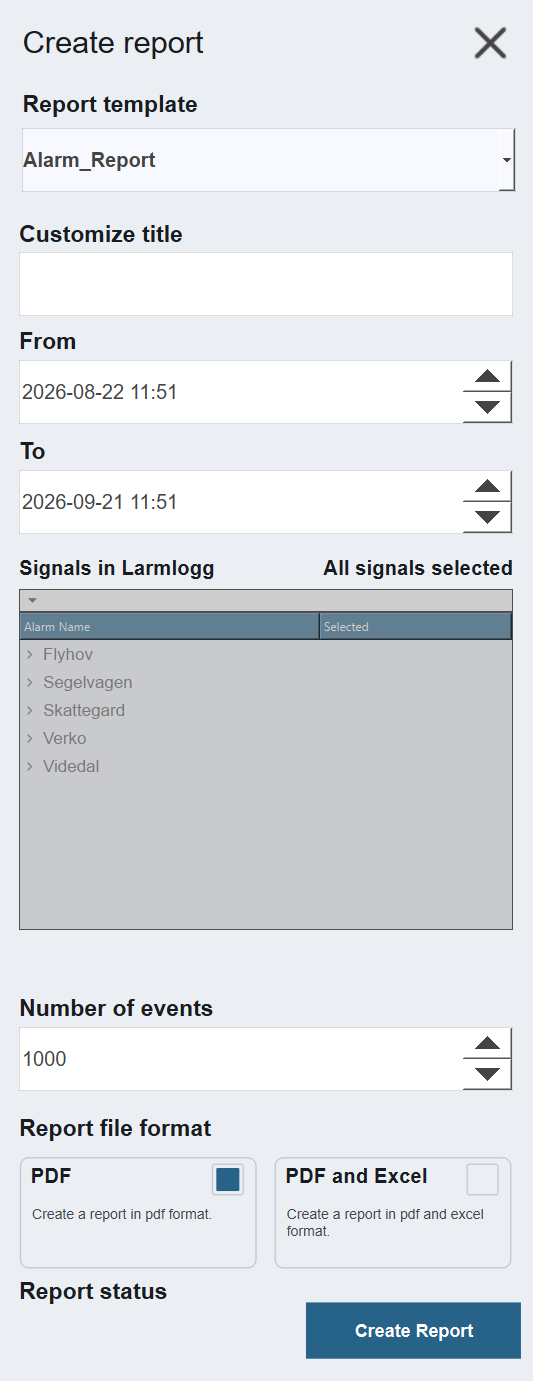
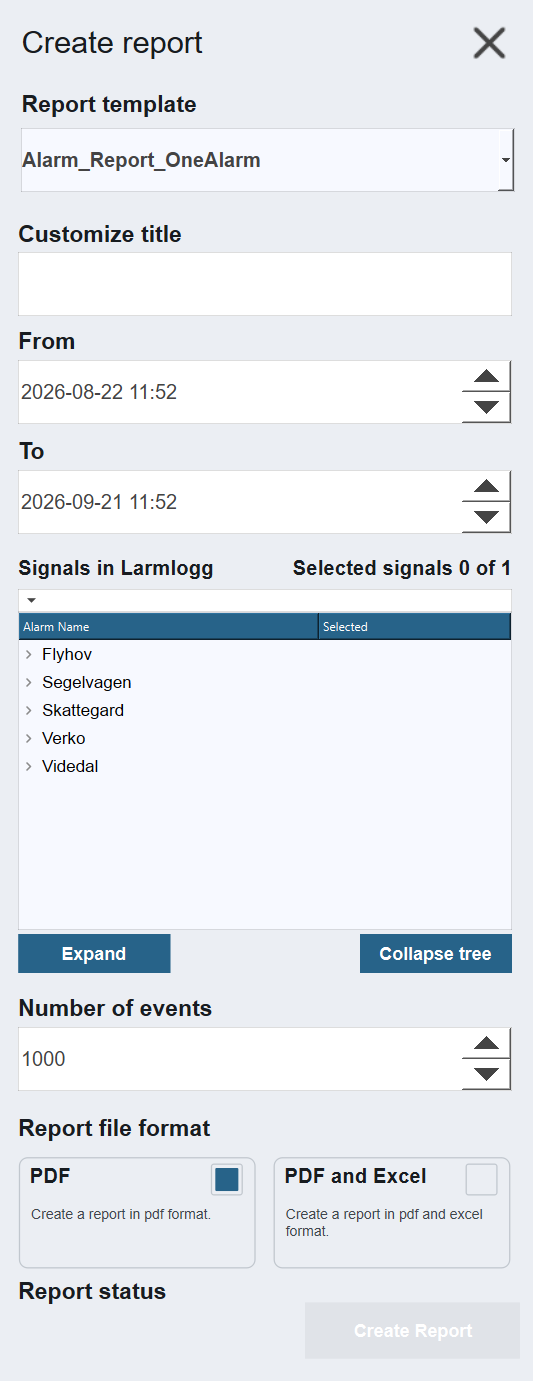
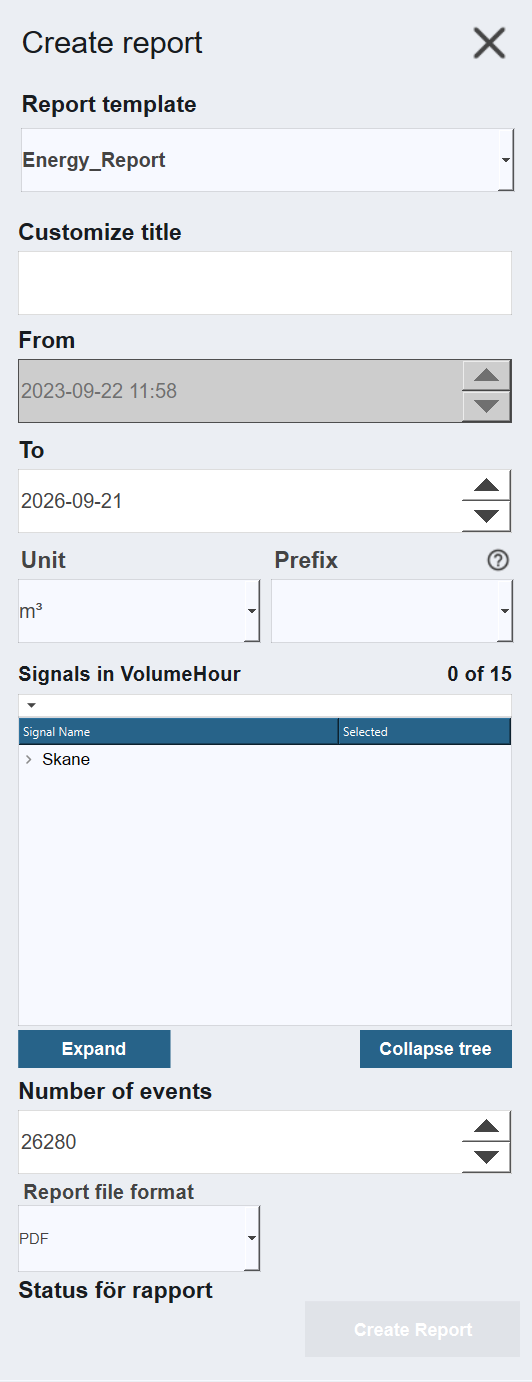
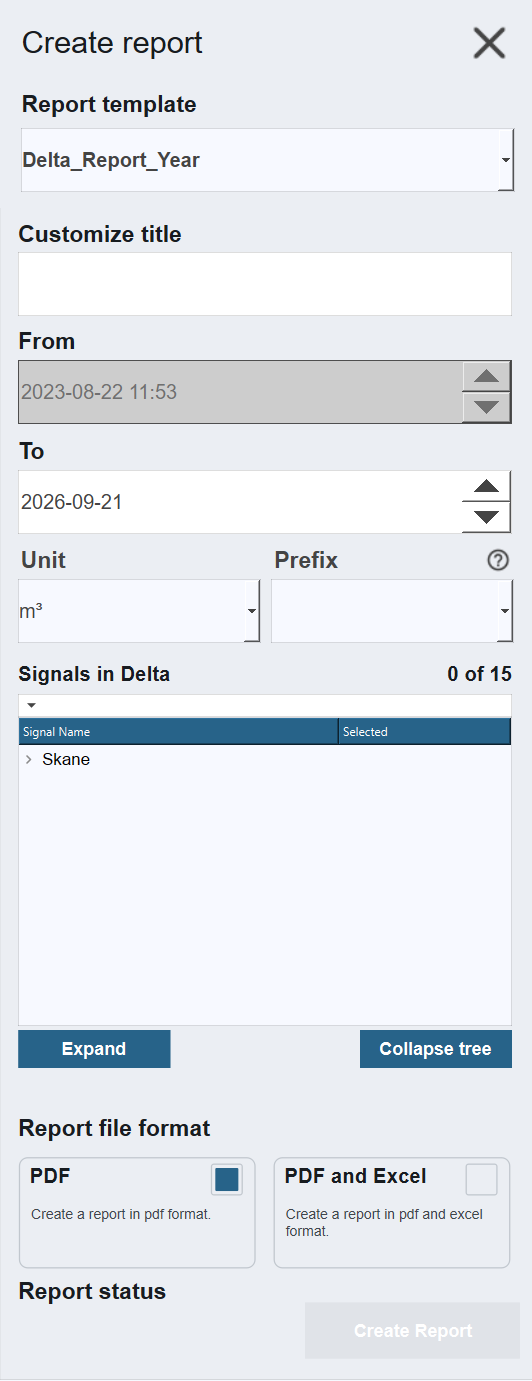
The weekly controllers are not shown, as they share the design of their yearly counterparts.
The six ReportControllers share a similar structure but differ in which options are available and which loggers are shown in the TreeView. Below is a description of each option:
- Report template — The report template to use. Defaults to Alarm Report. A guide to creating templates can be found here.
- Customize title — Sets the title of the report, which appears on the front page.
- From — The start time of the recording period. This field is locked for Energy Reports and Delta Reports, as they require historical data from that point onwards. See here for configuration.
- To — The end time of the recording period.
- Unit and Prefix — The unit the report is presented in. Present on the Energy and Delta controllers only. Alarm reports carry no unit. See Units and prefixes below.
- LoggerList — Displays the signals available in the selected logger. Locked for Alarm Reports, as they include all signals automatically. On the Energy and Delta controllers it also stays locked until a unit is chosen, and then lists only the signals measured in that unit. See Units and prefixes.
- Number of events — The maximum number of events to include. For Energy Reports, this defaults to the number of hourly events in the selected time period. In Delta Reports, this is handled in the onLoad script.
- Report file format — The output format of the report: either PDF or PDF and XLSM.
- Report status — Displays the current status of the report, including completion or any errors.
At least one signal must be selected
A report cannot be created until at least one signal has been selected in the LoggerList. This does not apply to Alarm Reports, which include all signals automatically.
Once generated, the report is added to the report list where it can be previewed.
Report types
The Alarm Report and Alarm Report One Alarm collect alarm data for the selected time period. The Energy Report displays energy data over a three year period, with an individual graph per year and a three year summary. The Energy Report Week follows the same structure but displays data on a weekly basis, covering three weeks by default with an individual graph per week and a three week summary.
The Delta Report Year and Delta Report Week reports show the change between consecutive readings rather than the logged values themselves, which suits meters reporting a continuously increasing total. Delta Year presents a monthly delta per column, one column per month, and covers three years by default. Delta Week presents a daily delta per column, one column per weekday, and covers three weeks. Neither is tied to a single logging interval: Delta Year accepts intervals from monthly to daily, or down to hourly with the alternative template, and Delta Week from hourly to daily. For detailed configuration of each report type, see Configuring.
Units and prefixes
The Energy and Delta reports carry a display unit, chosen with the Unit and
Prefix pickers on the report controller. Unit selects the base unit, Prefix
selects the SI prefix applied to it, and the two are combined when the report is
created, so k and Wh together give kWh.
Alarm reports have no unit pickers, and unit handling is skipped for them entirely.
Signals selected into one report are not guaranteed to share the same native prefix. One
signal may be logged in Wh while another is already logged in kWh. Each selected
signal therefore gets its own scale factor, calculated from that signal's own prefix and
the chosen display unit.
The values themselves are not converted beforehand. Each signal is queried in the unit it
was logged in, and the factors are passed to the template alongside the data, appearing on
the Meta sheet as Factor1 to Factor15 together with the chosen unit. The template
applies them, so the scaling happens in the template rather than in the script.
The unit list is built from the units of the signals available in the selected logger, so only units the project actually logs are offered.
The chosen unit also filters the signal list. The TreeView stays locked until a unit is selected, and then lists only the signals measured in that unit. Changing the unit clears the current selection, since the signals picked under the previous unit are no longer in the list.
Scheduling a report in WideQuick® Runtime
To schedule a report, navigate to History → Reports → Reports - Schedule.
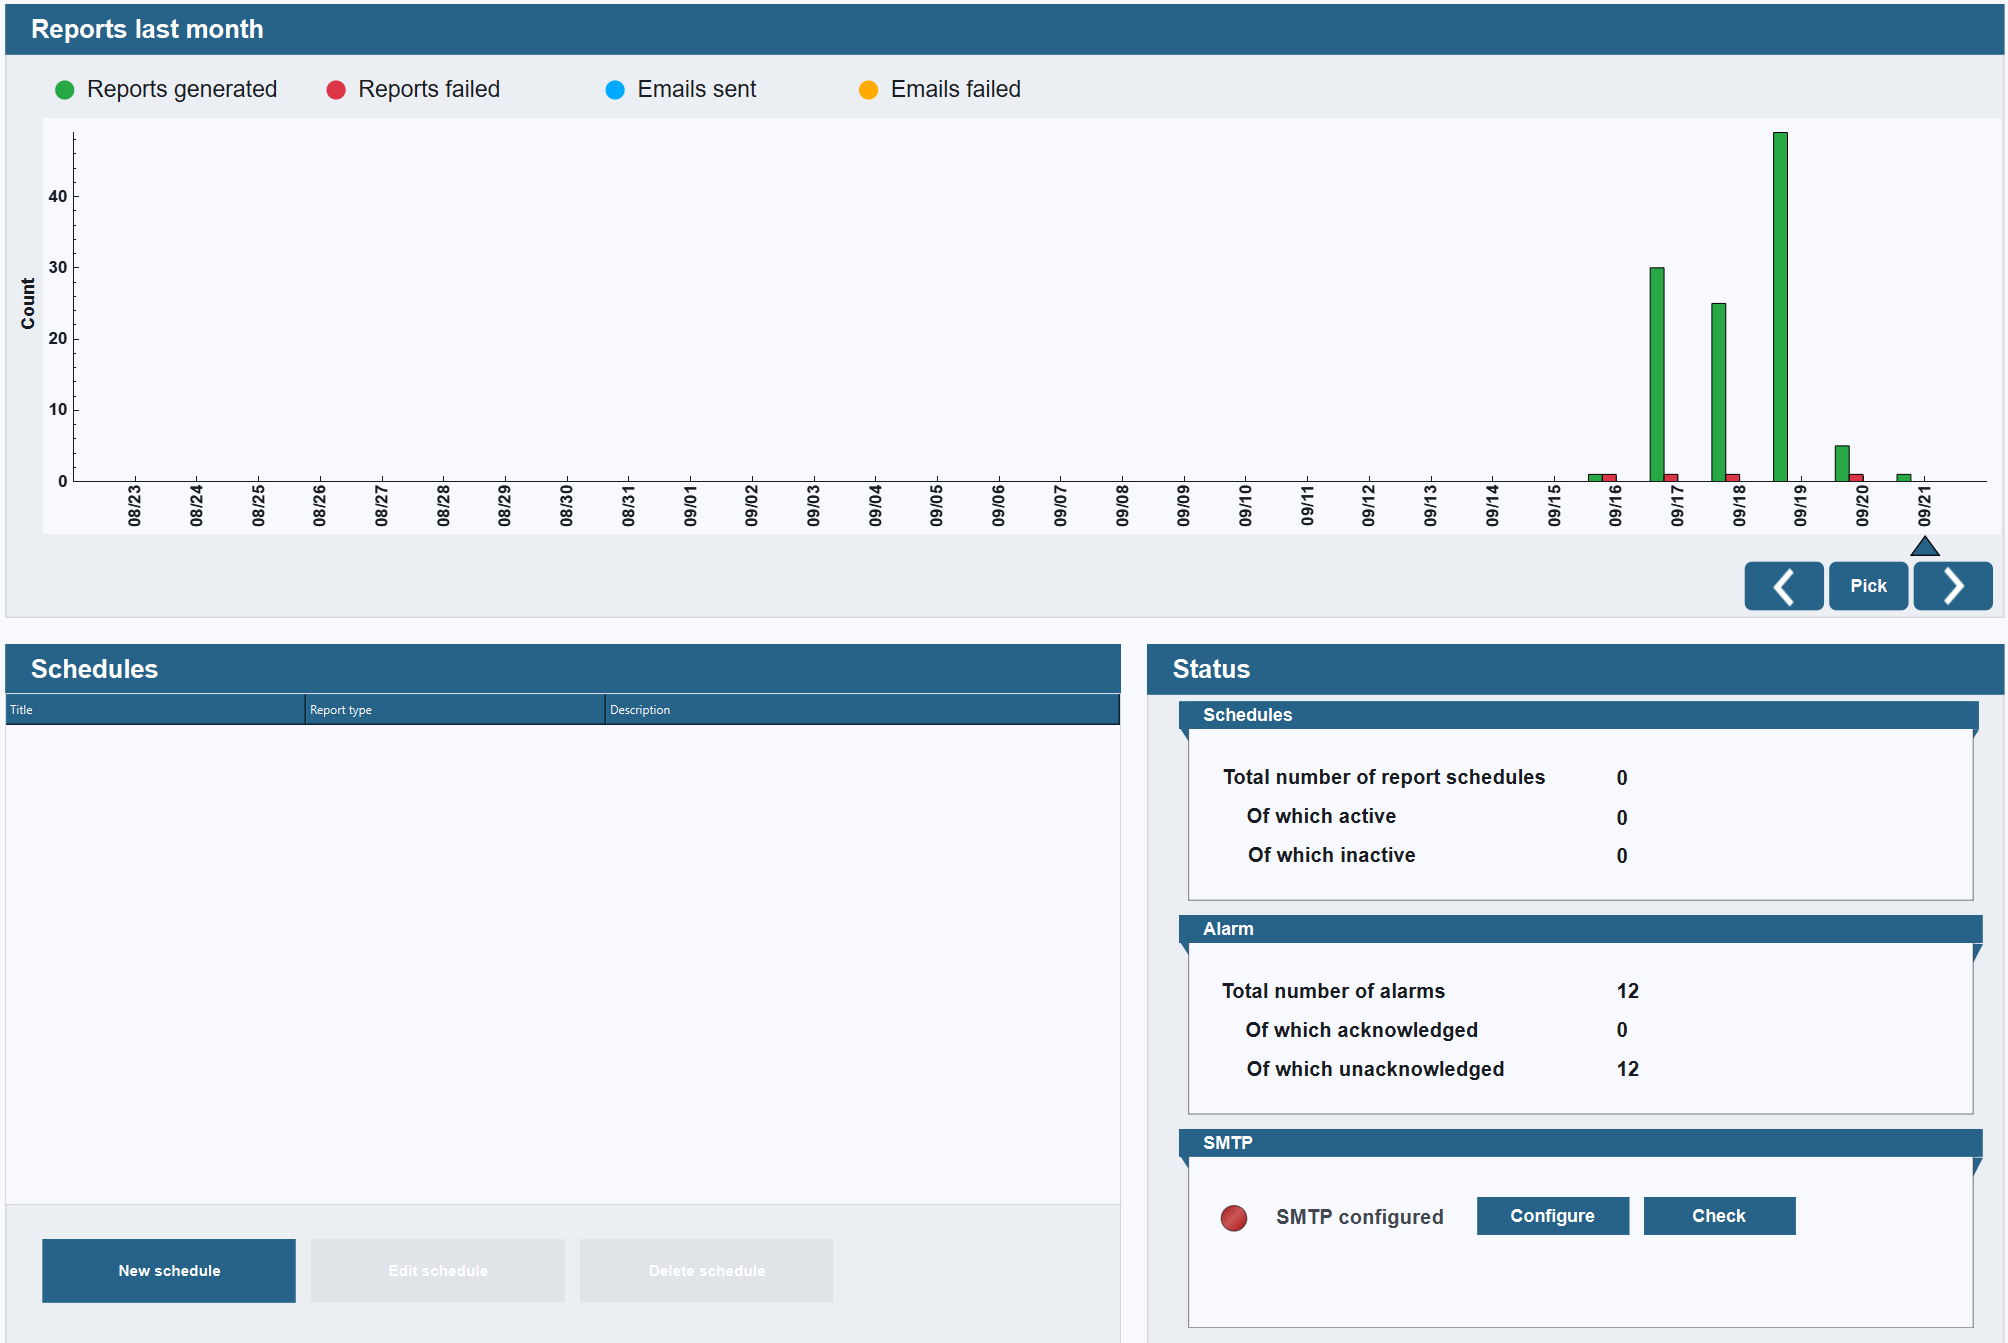
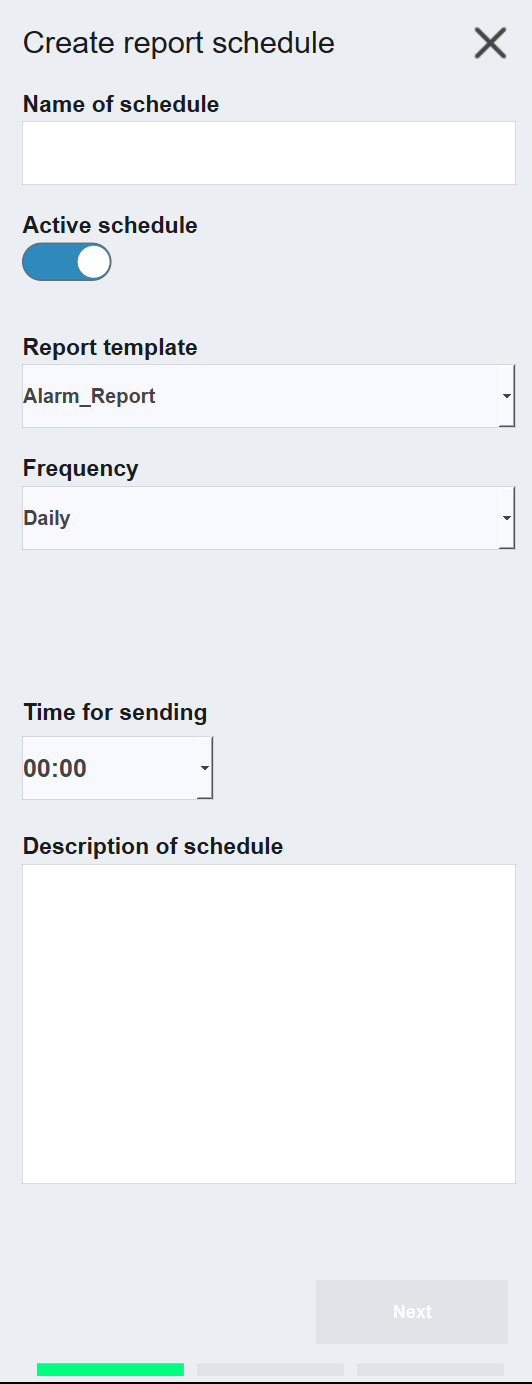
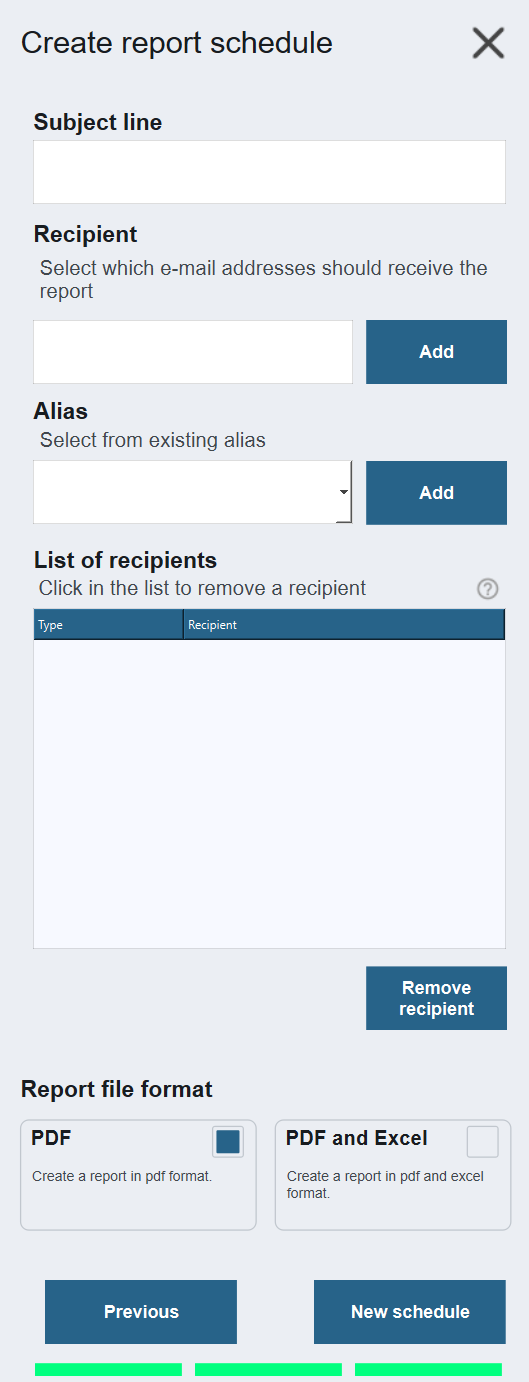
Click New schedule to create a new schedule. A menu with three pages will appear on the right. Note that the second page changes depending on the selected Report template.
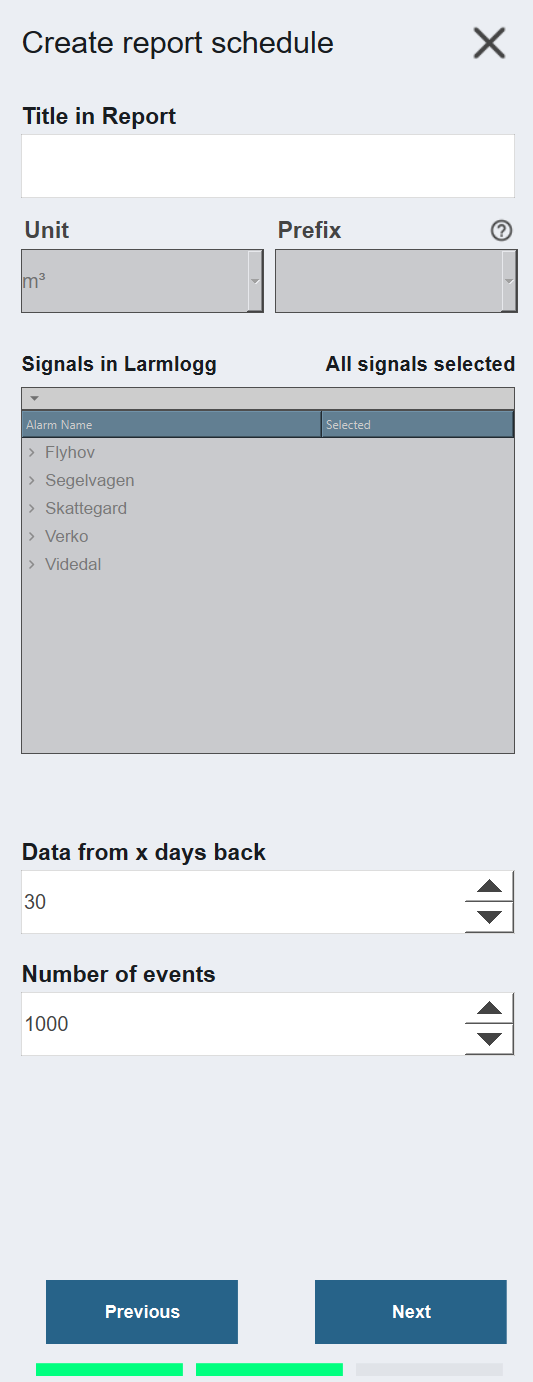
The second page mirrors the report configuration described in the previous section, including the Unit and Prefix pickers. A scheduled report therefore stores the same display unit and per-signal scale factors as a report created by hand, so a scheduled run and a manual run of the same configuration produce the same values.
Below are descriptions of the options on the first and third pages:
-
First page
- Name of schedule — The name of the schedule.
- Active schedule — Toggles whether the scheduled report is active and will be sent.
- Report template — The report template to use. Defaults to Alarm Report. See here for guidance on creating templates.
-
Frequency — How often the report is generated. The available options and their additional settings are:
- Daily — Select a specific time of day. Times are available in 30-minute intervals.
- Weekly — Select a day of the week and a specific time of day.
- Monthly — Select a day of the month and a specific time of day. The system automatically handles months with 30 or 31 days, as well as February and leap years.
- Quarterly — Select which month of the quarter (1, 2, or 3), the day of that month, and a specific time of day.
- Yearly — Select a month, the day of that month, and a specific time of day.
-
Description of schedule — A description of the schedule.
Note
Schedules are checked every 5 minutes. The configured time is therefore approximate, and reports may be sent up to 5 minutes after the set time.
-
Third page
- Subject line — The subject line of the email in which the report is sent.
- Recipient — The recipients of the email. Accepts both email addresses and aliases.
- Alias — Displays available aliases. Select one and click Add to add it as a recipient.
- List of Recipients — Shows the full list of recipients, indicating whether each entry is an email address or an alias.
- Report file format — The format in which the report is sent: PDF or Excel.
Next Steps
- Configuring — built-in report templates and report history
- Extending — creating custom templates and report controllers