Alarms - Configuring
Creating alarm groups
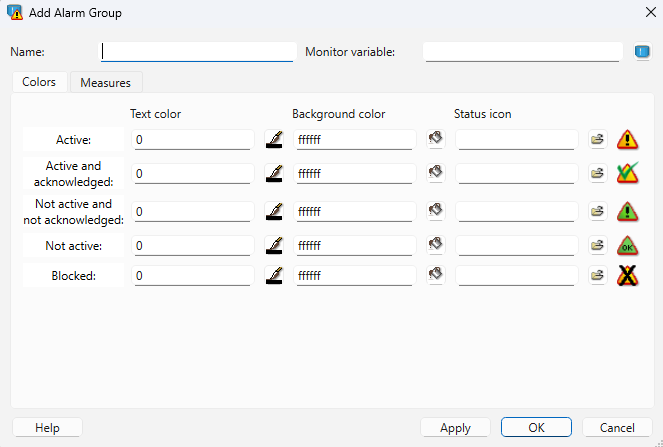
Alarms are organised into groups in WideQuick® Designer. Each group defines shared defaults for colors, icons and measures, which its alarms inherit unless overridden individually.
- In the project tree, right-click Alarms under Data Store and select Add Group....
- Enter a Name for the group.
- Set the Monitor variable, a boolean variable that is
truewhenever any alarm in the group is active. - Optionally configure default Colors for each alarm state, default Icons, and a default Measure for the group.
- Click OK.
Adding alarms
Once a group exists, open it (double-click or right-click → Open) and click Add to create a new alarm.

| Field | Description |
|---|---|
| Name | Unique name for the alarm within the group |
| Alarm class | Label used to rank or categorise alarms, for example 1, A or High |
| Ack rule | When the alarm can be acknowledged. See Acknowledgement rules. |
| Text | Short label shown in the alarm list, e.g. Motor overheating |
| Details | Longer description shown when the alarm is expanded in the log |
| Activation | Trigger condition and optional delay before the alarm fires |
| Block type | Whether the alarm can be suppressed: None, Manually (by operator), or Automatic (by a variable) |
| Block variable | Variable used when Block type is Automatic. The alarm is suppressed while this variable is true. |
| Colors | Per-alarm color overrides. If left blank, the group defaults are used |
| Activation monitor | Boolean variable set to true while the alarm is active |
| Acknowledge monitor | Boolean variable set to true while the alarm is acknowledged |
| Measure | Action available in the alarm list, used to add a GoTo link. See GoTo in Alarm Groups |
| Description | Internal note about the alarm. Not shown at runtime |
Activation
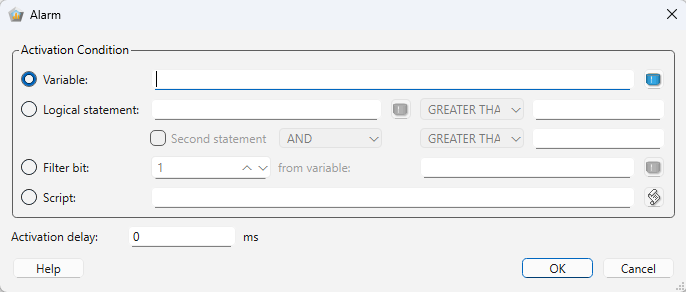
Double-click the Activation field to configure the trigger. Set the variable the alarm monitors and optionally add a delay. The alarm then fires only if the condition has been true for the full delay period.
Acknowledgement rules
- Normal — can be acknowledged at any time.
- Strict — can only be acknowledged after the alarm has gone inactive.
- Auto — acknowledged automatically when the alarm goes inactive. Can also be acknowledged manually while still active.
Measure
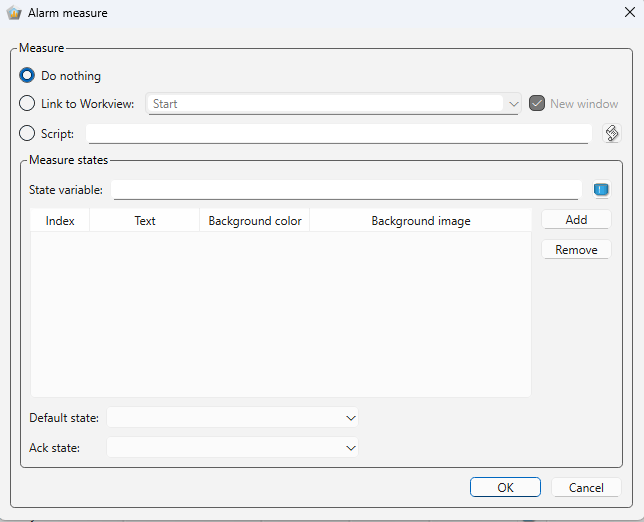
The Measure field on an alarm enables an action column in the alarm list. Configuring a GoTo measure lets operators navigate directly to the object that triggered the alarm by pressing the measure in the list. See GoTo in Alarm Groups for setup instructions.
Alarm notification schedules
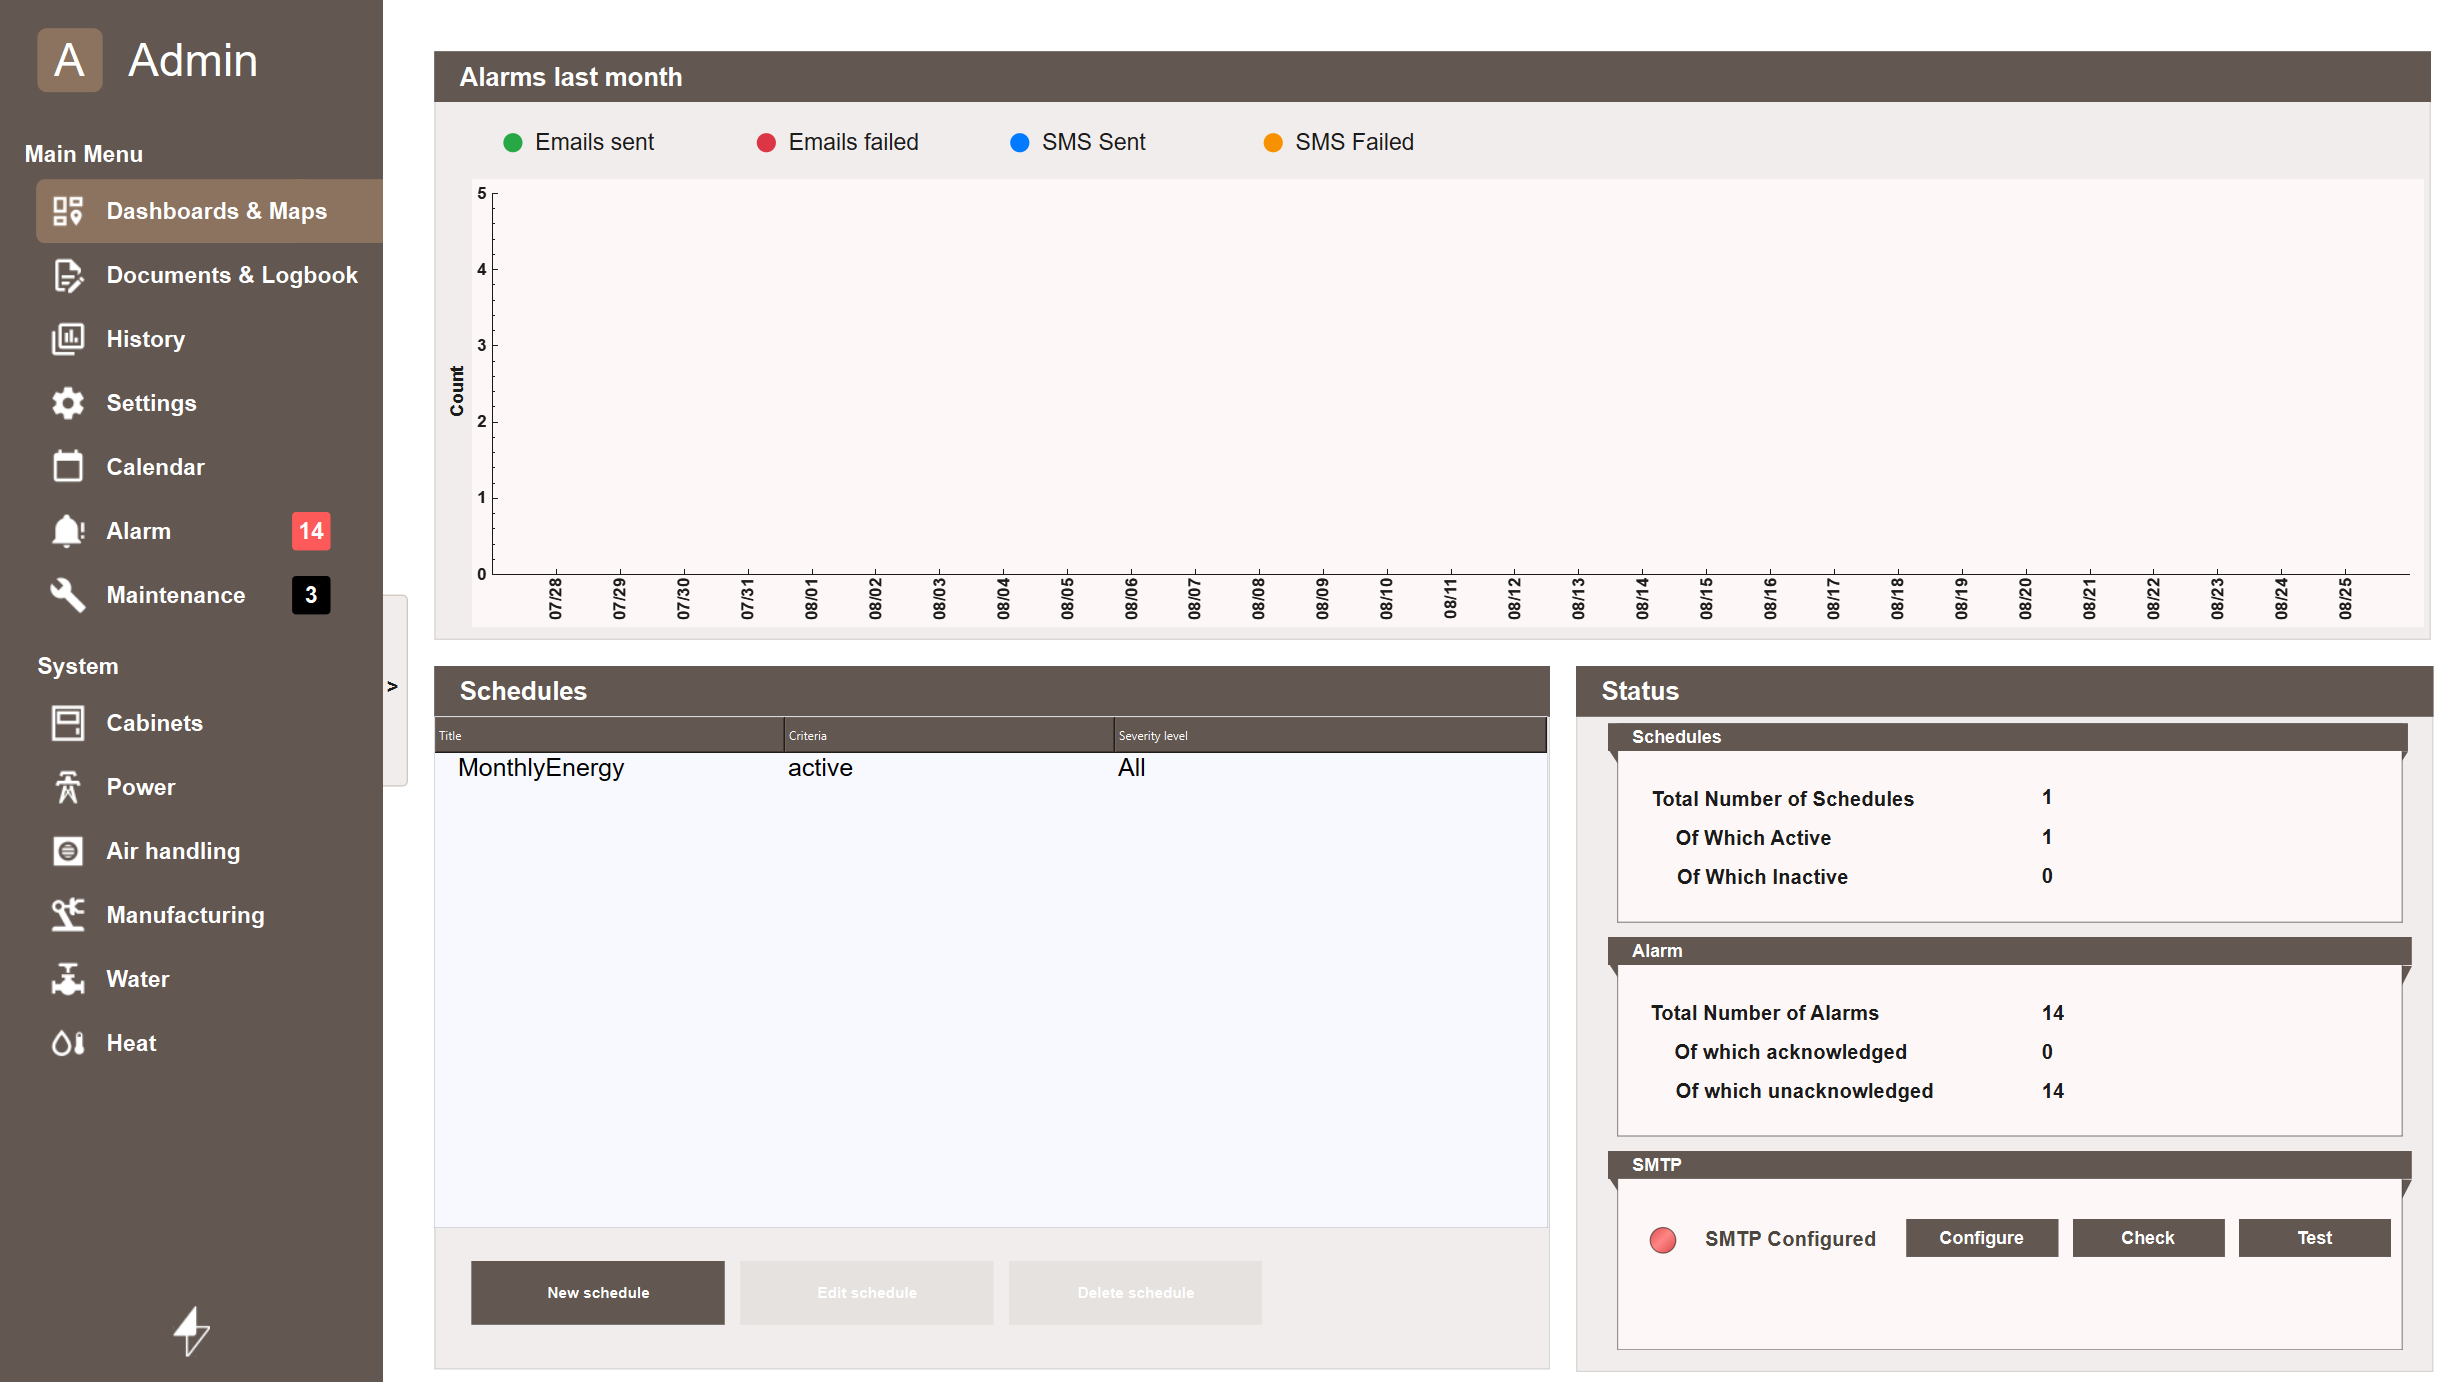
The Alarm - Schedule view controls when and to whom alarm notifications are sent by email or SMS. It shows a bar chart of emails and SMS messages sent and failed over the last month, a list of all configured schedules, and a status panel with schedule counts, current alarm counts, and SMTP status.
Requirements
Notification schedules require scAlarmSender to be running and a configured email or SMS channel. See Extending.
Creating a schedule
Click New schedule to open the creation wizard. It steps through three pages.
Step 1 — When
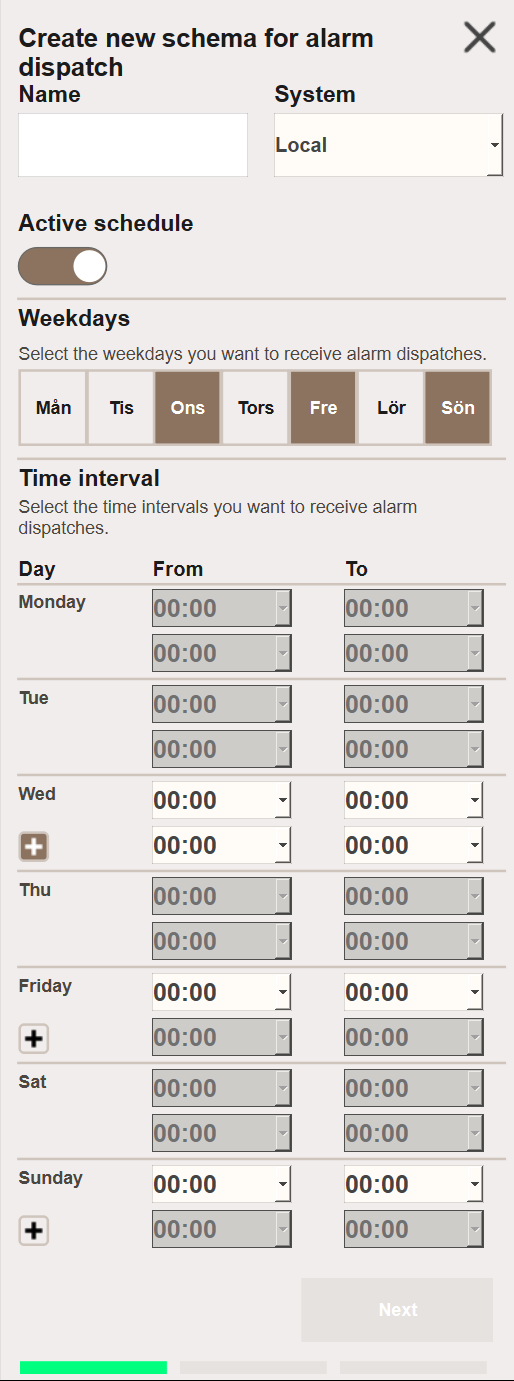
- Name — name for the schedule.
- System — which system this schedule applies to: the local system or a connected remote system.
- Active schedule — toggle to enable or disable the schedule without deleting it.
- Weekdays — select which days of the week the schedule is active. Only the selected days will appear in the Time interval section below.
- Time interval — configure the active time windows for each selected day. Each
day shows a primary From/To time slot. Click the + button to add a secondary
time slot for that day, allowing two separate notification windows on the same day.
Setting both From and To to
00:00disables notifications for that time slot. To receive notifications for the entire day, set From to00:00and To to23:59.
Note
Setting To to 23:59 covers the full day including the final minute.
Step 2 — What
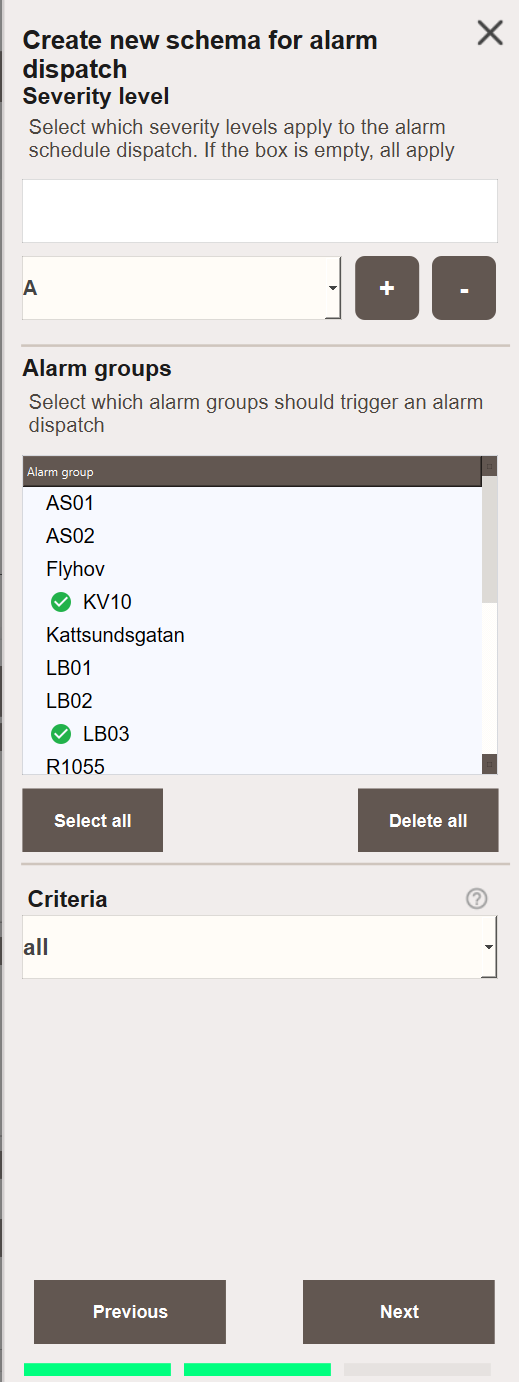
- Severity level — which alarm classes trigger this schedule. Leave empty to include all classes.
- Alarm groups — which alarm groups are monitored. Use Select all to include all groups.
- Criteria — which alarm state the notification is sent on. See Notification criteria below.
The schedule list shows which alarm classes and which criteria each schedule monitors, and the status panel updates the number of schedules and their active state live rather than only when the view is opened.
Step 3 — Who
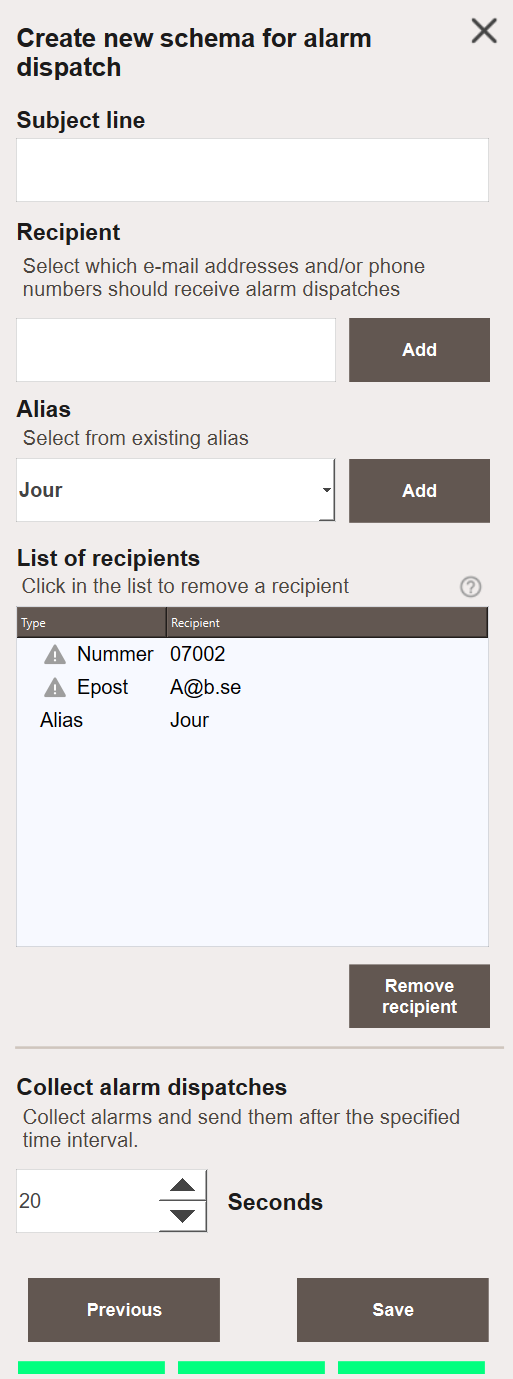
- Subject line — subject used for outgoing email notifications.
- Recipient — add individual email addresses or phone numbers directly.
- Alias — select from configured aliases to add a group of recipients at once.
- Collect alarm dispatches — delay in seconds before sending. Alarms that trigger within this window are collected and sent together in a single notification.
Notification criteria
A schedule sends on one alarm state, chosen with the Criteria picker. The five values map onto the states the alarm logger itself records.
| Criteria | Sends when |
|---|---|
| all | Any state change. |
| active | The alarm becomes active and has not yet been acknowledged. |
| acknowledged | The alarm is acknowledged while still active. |
| unacknowledged | The alarm clears but is still awaiting acknowledgement. |
| inactive | The alarm is both cleared and acknowledged, so fully resolved. |
Only acknowledged and inactive carry a user name, so those are the only criteria whose notifications can report who acknowledged the alarm. Alarms with the acknowledgement rule Auto typically move straight from active to inactive with no user name, skipping the two middle states entirely.
Existing schedules keep their previous behaviour
The criteria column is added to mail_schedules on first start and defaults to active, which is the state schedules sent on before criteria existed. No schedule changes behaviour on upgrade.
Criteria are stored in a canonical form
The picker displays criteria translated into the active language, but the value written to the database is always the canonical English key. A schedule created in one language therefore reads correctly in another.
Editing and deleting schedules
Select a schedule in the list and click Edit schedule to modify it. Active and inactive status can be toggled from within the edit dialog.
Click Delete schedule to remove the selected schedule.
Next Steps
- Extending — configuring email and SMS for alarm notifications